
More from michel brown


Related Blogs


Les archives
Partage Social
How to Install and Secure Aluminum Bleacher Planks Properly
Corps
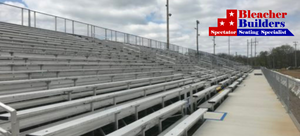
Aluminum bleacher planks are a durable and cost-effective solution for seating at stadiums, parks, schools, and other venues. Whether you are installing new ones or replacing old ones, it is important to do the job correctly to ensure safety and longevity. Proper installation will prevent unnecessary wear and tear, while secure fastening will keep the bleacher planks stable for years. This guide will walk you through installing and securing aluminum bleacher planks properly. If you are looking for used bleacher planks for sale, you will also find helpful tips on repurposing and installing them effectively.
Choosing the Right Aluminum Bleacher Planks
Understanding the Material
Aluminum bleacher planks are popular because they are lightweight, rust-resistant, and require minimal maintenance. Unlike wooden planks, aluminum does not warp, making it a long-lasting outdoor and indoor seating solution. If you are considering purchasing used bleacher planks for sale, make sure they are in good condition. Check for any signs of damage, such as bending, deep scratches, or corrosion. Even though aluminum is rust-resistant, improper storage can lead to some deterioration.
Selecting the Correct Size and Style
Bleacher planks come in various sizes and styles, including:
- Standard bench-style planks – Ideal for general seating in schools and community centers.
- Planks with backrests – Provide additional support for spectators.
- Non-slip planks – Feature a textured surface to prevent slipping in wet conditions.
Ensure you measure your bleacher frame before purchasing planks to ensure a proper fit.
Preparing for Installation
Gathering the Necessary Tools and Materials
Before starting, you will need the following tools and materials:
- Aluminum bleacher planks
- Measuring tape
- Drill with metal drill bits
- Fasteners or anchor bolts
- Screwdrivers or wrenches
- Leveling tool
- Safety gear (gloves, goggles)
Inspect the mounting holes if you are working with used bleacher planks for sale. If they do not align with your bleacher frame, you may need to drill new holes.
Ensuring a Proper Framework
Your bleacher frame must be in good condition before installing the planks. If it is rusty or damaged, consider repairing or replacing it before proceeding. Also, check that all support beams are securely in place, as weak support can lead to instability. Confirm that the used bleacher planks for sale will fit the existing framework. If necessary, trim or modify them for a secure installation.
Installing Aluminum Bleacher Planks
Positioning the Planks Correctly
- Lay out the planks – Place them on the bleacher frame to ensure proper spacing and alignment.
- Check for evenness – Use a leveling tool to ensure the planks sit evenly across the entire structure.
- Align the mounting holes – If using bleacher planks, ensure the pre-drilled holes align with the existing frame. If they don’t, mark the correct positions and drill new holes as needed.
Securing the Planks with Fasteners
- Use the proper fasteners – Select corrosion-resistant bolts or screws designed for aluminum to ensure a firm hold.
- Drill pilot holes – If the frame does not have pre-drilled holes, use a drill to create pilot holes for secure fastening.
- Attach the planks – Place the bolts through the holes and tighten them securely with a wrench.
- Check for movement – Press down on the planks to ensure they do not shift. If they move, tighten the fasteners further or add additional bolts.
For used bleacher planks for sale, ensure all bolts are tight, and the planks do not have any loose connections that could lead to instability.
Enhancing Safety and Longevity
Inspecting the Installation
After securing all bleacher planks, perform a thorough inspection:
- Walk across the bleachers to test for any movement or creaking sounds.
- Ensure all bolts are fully tightened.
- Check for any sharp edges that might need smoothing down.
Routine Maintenance Tips
To extend the lifespan of your aluminum bleacher planks:
- Regularly check for loose fasteners and tighten them as needed.
- Clean the planks periodically to prevent dirt buildup.
- If bleacher planks are used for sale, consider adding a protective coating to restore their appearance and improve durability.
Conclusion
Proper installation and securing of aluminum bleacher planks is essential for safety and long-term durability. Whether setting up brand-new seating or repurposing used bleacher planks for sale, following the correct steps will ensure a sturdy and reliable seating area. By choosing the right planks, preparing the framework, and using proper fastening techniques, you can create a bleacher system that will last for years. Always conduct regular inspections and maintenance to keep your seating secure and in top condition. With the right approach, your aluminum bleacher planks will provide safe and comfortable seating for all spectators.


commentaires