
More from Trending Bizzs


Related Blogs

أرشيف
حصة الاجتماعي
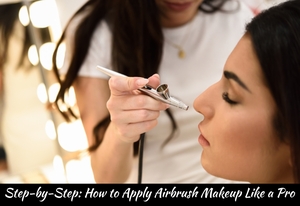
Step-by-Step: How to Apply Airbrush Makeup Like a Pro
الجسم
Airbrush makeup has become a game-changer in the beauty world, especially for special occasions like weddings, photo shoots, and events where a flawless, long-lasting finish is a must. Unlike traditional makeup application methods, airbrush makeup uses a specialized tool to spray a fine mist of foundation and other cosmetics onto the skin, creating a smooth, even, and natural-looking finish. If you’ve ever admired that perfectly polished look that seems to glow in photos and want to learn how to apply airbrush makeup like a pro, this step-by-step guide is for you.
What Is Airbrush Makeup?
Before diving into the application steps, it’s helpful to understand what airbrush makeup is. This technique uses an airbrush gun connected to an air compressor that sprays a lightweight, buildable foundation or makeup product in a fine mist onto the skin. This results in an ultra-even and natural coverage that looks flawless both in person and on camera.
Why Learn to Apply Airbrush Makeup?
-
Flawless finish: Airbrush makeup blends seamlessly without streaks or patches.
-
Longevity: It tends to last much longer than traditional makeup.
-
Photo-ready: Airbrush makeup looks amazing under flash photography.
-
Lightweight feel: Despite the full coverage, it feels light on the skin.
-
Suitable for all skin types: Especially beneficial for sensitive or oily skin.
Now, let’s get into the detailed process to apply airbrush makeup like a professional.
Step 1: Gather Your Tools and Products
To begin, make sure you have everything you need:
-
Airbrush machine: Includes the compressor and airbrush gun.
-
Airbrush foundation: Choose a product specifically formulated for airbrush use.
-
Primer: Prepares your skin and helps makeup adhere better.
-
Setting spray or powder: To lock in the makeup.
-
Moisturizer: Hydrates your skin.
-
Makeup remover and cleansing wipes: For corrections and clean-up.
-
Optional: Airbrush blush, contour, and highlighter if you want to build a full face.
Having high-quality products and a clean airbrush system is essential for a smooth application.
Step 2: Prep Your Skin
Airbrush makeup performs best on a clean, smooth canvas. Follow these prep steps:
-
Cleanse your face thoroughly to remove dirt, oils, and residue.
-
Exfoliate gently if needed, to smooth out any dry patches.
-
Moisturize using a lightweight, non-greasy moisturizer. Let it absorb completely.
-
Apply a primer designed to create a smooth base and extend makeup wear.
Proper skin prep ensures your makeup won’t cling to dry spots or slide off oily areas.
Step 3: Set Up Your Airbrush Equipment
-
Connect the airbrush gun to the compressor and plug it in.
-
Fill the makeup reservoir on the airbrush gun with your chosen airbrush foundation. Use the dropper or small funnel to avoid spills.
-
Test the spray on the back of your hand or a tissue to get a feel for the pressure and spray pattern. Adjust the airflow if necessary, usually between 15-25 psi for facial makeup.
Practicing the spray pattern helps prevent over-application or blotches.
Step 4: Apply the Foundation
Here’s the crucial part where technique makes a huge difference:
-
Hold the airbrush gun about 6-8 inches away from your face.
-
Start spraying from the center of your face — around the nose and cheeks — moving the gun in small, circular motions. This ensures even coverage.
-
Keep the gun moving continuously to avoid buildup in one area. The fine mist will blend naturally.
-
Build coverage gradually: It’s better to apply multiple light layers than one thick one. After each layer, let the makeup dry for a minute before applying the next.
-
Spray in light passes over the forehead, chin, nose, and neck for a consistent skin tone.
-
If you need more coverage on problem areas like redness or blemishes, spray closer (around 3-4 inches) for a few seconds, then blend out with your airbrush.
Pro tip: Breathe out and pause briefly while spraying near the mouth and eyes to avoid inhaling the mist.
Step 5: Apply Airbrush Blush, Contour, and Highlight (Optional)
To create dimension and add color to your face, many pros use airbrush blush, contour, and highlight powders or creams.
-
Blush: Apply to the apples of your cheeks with gentle sweeping motions. Use a soft pink or peach shade that suits your skin tone.
-
Contour: Use a slightly darker tone to sculpt under your cheekbones, jawline, and sides of the nose.
-
Highlight: Add a light, shimmering tone to the tops of your cheekbones, brow bones, and cupid’s bow for a subtle glow.
These steps can be done after your base foundation is dry. Remember to blend thoroughly to maintain a natural look.
Step 6: Blend and Perfect the Finish
Once the main layers are done:
-
Use a soft clean brush or sponge to gently blend any edges or spots that look heavier.
-
You can also lightly mist a setting spray over your face to help the makeup lock in and maintain a fresh look.
Avoid using heavy powders that can dull the airbrush finish. If you have oily skin, a translucent powder applied sparingly on your T-zone can help control shine.
Step 7: Clean Your Airbrush Equipment
Proper cleaning after every use is essential to keep your airbrush machine working perfectly:
-
Empty any leftover makeup from the reservoir.
-
Flush the system with an appropriate airbrush cleaner or distilled water until it sprays clear.
-
Disassemble and clean the nozzle, needle, and other parts as per manufacturer instructions.
-
Dry and store your equipment safely.
Keeping your airbrush clean ensures consistent spray quality and prevents clogs.
Tips for Applying Airbrush Makeup Like a Pro
-
Practice makes perfect: Mastering airbrush makeup requires patience and steady hands. Practice on your arm or hand before applying to your face.
-
Keep your face still: Try to stay relaxed and avoid moving too much while spraying.
-
Adjust airflow pressure: Different makeup products and effects may need varied pressure settings.
-
Use high-quality products: Not all foundations are made for airbrush use. Look for specially formulated airbrush makeup for the best results.
-
Stay hydrated: Well-hydrated skin allows makeup to sit better and look more natural.
-
Work in a well-lit area: Good lighting helps you spot areas needing more coverage or blending.
-
Wear protective clothing: Airbrush makeup can create overspray, so wear a smock or old clothing during application.
Final Thoughts
Applying airbrush makeup like a pro isn’t as intimidating as it may seem at first. With the right tools, products, and technique, anyone can achieve that flawless, lightweight, and camera-ready finish that airbrush makeup is famous for. Whether you’re a professional makeup artist, a bride looking for a perfect bridal makeup service, or simply a beauty enthusiast wanting to elevate your makeup game, mastering airbrush application can make a significant difference.
By following these steps—prepping your skin, mastering your airbrush equipment, applying makeup in thin layers, and blending seamlessly—you can create a stunning, long-lasting look that holds up through every smile, tear, and dance move. So take your time, practice regularly, and enjoy the smooth, radiant finish that only airbrush makeup can provide!


تعليقات